
Most designers and marketers today rely on moodboards to set the style and tone of their website projects before exploring into the design phase.
In this digital age, creating a captivating website moodboard has become easier and more dynamic thanks to tools like Milanote.
This step-by-step guide will walk you through the modern process of crafting a visually appealing moodboard for your website, incorporating imagery, color schemes, fonts, and even motion elements.
Key Takeaways:
- Modern Process: Creating a website moodboard in Milanote offers a digital and collaborative approach.
- Explore and Experiment: Moodboards allow for exploration of style, color, imagery, and other visual elements before exploring into the design phase.
- Utilize Inspiration Sources: Use existing material, inspiring imagery, motion examples, and color/fonts to guide your moodboard creation.
- Collaborate and Seek Feedback: Invite team members to provide input, and be open to constructive criticism to refine your design.
- Stay Organized and Creative: Transform a messy board layout into an organized composition while remaining open to new ideas and inspiration.
Step 1: Define Your Creative Boundaries
Identifying the Purpose of Your Moodboard
Even before exploring into the exciting world of creating a moodboard for your website, it’s crucial to first identify the purpose behind it.
In this initial stage, take a moment to ponder over what you aim to achieve with your moodboard.
Are you looking to explore various design elements, experiment with different color palettes, or establish a visual direction for your website?
Selecting a Central Theme or Concept
Concept: To kickstart the moodboarding process, start by selecting a central theme or concept that will serve as the creative anchor for your design exploration.
This overarching idea will guide your selection of images, colors, fonts, and other visual elements as you craft a cohesive and engaging moodboard for your website.
Step 2: Gathering Your Inspirational Arsenal
How to Collate Existing Brand Materials
For a successful website moodboard, it is necessary to gather existing brand materials that will serve as the foundation for your design inspiration.
This includes brand values, positioning statements, taglines, logos, and other design elements.
These materials provide insight into the essence and identity of the brand, guiding your visual direction.
Tips for Efficiently Organizing Your Resources
Step 2 involves organizing the resources you’ve gathered in a systematic manner to streamline your creative process.
Start by creating digital folders for different types of materials such as images, logos, and written content.
Utilize tools like Milanote to categorize and store these resources efficiently. Make use of color-coding and labeling to easily distinguish between various elements.
- Group similar items together for quick reference.
- Use descriptive file names to easily identify each resource.
- Utilize tags or keywords for easy searching.
Perceiving your brand materials as building blocks for your website design can help you create a cohesive and visually engaging moodboard.
By organizing your resources effectively, you pave the way for a smoother and more focused creative process.

Step 3: Infusing Your Board with Imagery
Sourcing Images that Speak to Your Vision
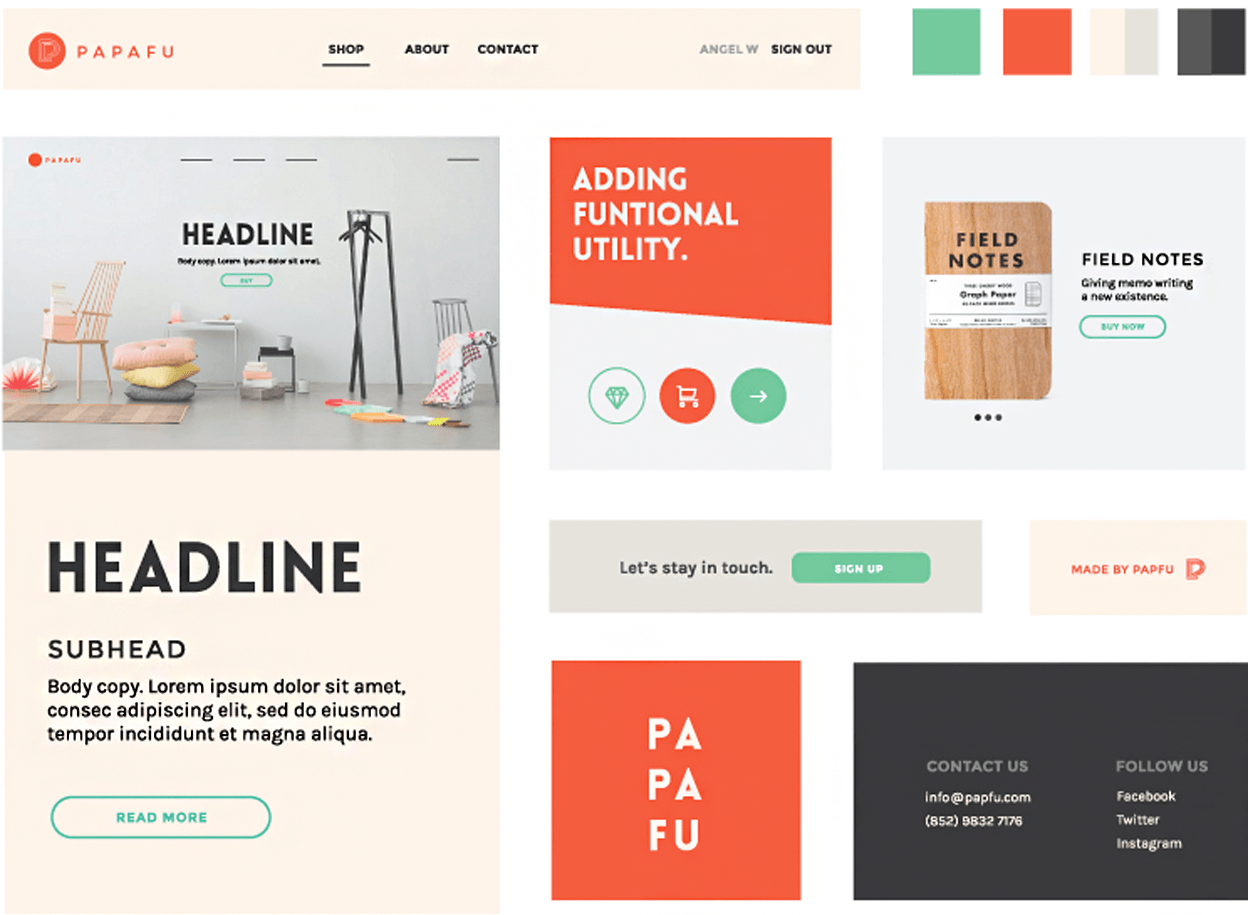
Your website moodboard is the visual backbone of your design process. It’s important to curate images that truly resonate with the essence of your project.
Any successful moodboard starts with sourcing images that speak to your vision. Whether you find inspiration in photography, illustrations, or graphics, each image should reflect the look and feel you aim to achieve.Curating Visuals that Set the Tone
Images play a vital role in communicating the tone of your website. Curating visuals that set the tone involves selecting images that evoke the emotions and atmosphere you want your audience to experience.
Images can convey warmth, professionalism, creativity, or any other specific feeling you want to elicit.
Your moodboard is your canvas, so be intentional in selecting visuals that capture the essence of your brand and design.
Curating visuals that set the tone on your board establishes a cohesive direction for your website design.
Each image should complement the others, creating a harmonious visual representation of your project’s aesthetic.
By carefully selecting and arranging your visuals, you can effectively convey the mood and style you envision for your website.
Step 4: Incorporating Motion and Sound
To create a truly engaging and immersive website moodboard, incorporating motion and sound elements can elevate the overall user experience.
In this step, we will explore how to select videos and animations that complement your theme, as well as factors to consider when choosing audio elements.
Selecting Videos and Animations that Complement Your Theme
Complement your chosen theme by selecting videos and animations that align with the overall look and feel you are aiming to achieve.
These dynamic elements can bring movement and visual interest to your moodboard, further enhancing the message you want to convey to your audience.
Factors to Consider When Choosing Audio Elements
- Ensure that the audio elements you choose match the tone and atmosphere of your website.
- Consider the pacing and rhythm of the audio to create a seamless experience for the user.
Choosing the right audio elements is crucial in setting the mood and enhancing the overall impact of your website.
Assume that by carefully selecting music or sound effects that align with your brand and message, you can create a cohesive and engaging digital experience for your audience.
Step 5: Harmonizing with Color and Typography
How to Craft a Compelling Color Palette
Despite the importance of visual elements in a website moodboard, color and typography play a significant role in setting the overall tone and feel of the design.
Colors can evoke emotions, convey brand identity, and guide user experience. When opting for a color palette, consider the brand’s personality, target audience, and industry trends.
Tips for Pairing Fonts Harmoniously
An crucial aspect of website design is choosing the right fonts that complement the overall aesthetic and enhance readability.
Pairing fonts harmoniously involves selecting fonts that contrast in style but still work well together.
Consider factors like font weight, style, and size to create a cohesive typography system that aligns with the brand’s voice and message.
- Experiment with different font pairings to find the perfect combination
- Ensure readability by choosing fonts with clear letterforms and ample spacing
Perceiving the nuances of typography can help elevate the overall look and feel of a website, making it more engaging and visually appealing.
Step 6: Bringing Order to Creative Chaos
Structuring Your Moodboard for Maximum Impact
Now that you have all your inspiration gathered in one place, it’s time to bring order to the creative chaos.
Structuring your moodboard effectively can elevate the impact of your design concept and help you communicate your vision more clearly.
By organizing your elements thoughtfully, you can create a cohesive visual narrative that guides the viewer through your ideas.
How to Prioritize and Arrange Elements
Some may find it overwhelming to have a plethora of images, colors, and fonts scattered across their moodboard.
In this case, it’s vital to prioritize and arrange elements in a way that highlights key components while maintaining a harmonious composition.
Consider the hierarchy of your elements, emphasizing the most important aspects of your design concept to create a focused and impactful moodboard.
Any designer knows that the placement and size of elements can significantly influence the overall feel of the moodboard.
By strategically arranging images, colors, and text, you can create a visual flow that guides the viewer’s eye and conveys the intended message effectively.Arrange your elements thoughtfully to create a visually engaging composition that captures the essence of your design direction.

Step 7: Staying Open to Evolution and Inspiration
Tools for Capturing Sudden Bursts of Creativity
An imperative aspect of the creative process is staying open to sudden bursts of inspiration or new ideas.
Utilizing tools like the Milanote mobile app or iPad app can help you capture these moments wherever you are, ensuring that no idea goes undocumented.
As Grace Coddington wisely said, “Always keep your eyes open. Keep watching. Because whatever you see can inspire you.”
How to Incorporate New Ideas Fluidly
Some of the best ideas can come at unexpected times or from unlikely sources. By fostering a mindset of openness and receptiveness, you can seamlessly integrate these fresh concepts into your website moodboard.
Collaborating in real-time with team members using digital moodboard platforms allows for a continuous flow of ideas and feedback, enhancing the creative process and ensuring a dynamic and innovative final product.
Incorporate these new ideas by revisiting your moodboard regularly, adapting elements as needed to reflect the evolution of your vision.
Embrace the chaos and allow room for experimentation and growth as you refine the look and feel of your website.
Step 8: Articulating the Narrative behind Your Board
How to Communicate the Story of Your Moodboard
Once again, as you progress with your website moodboard, it’s vital to articulate the narrative behind your visual choices.
This narrative will help others understand the thought process and inspiration driving the design direction.
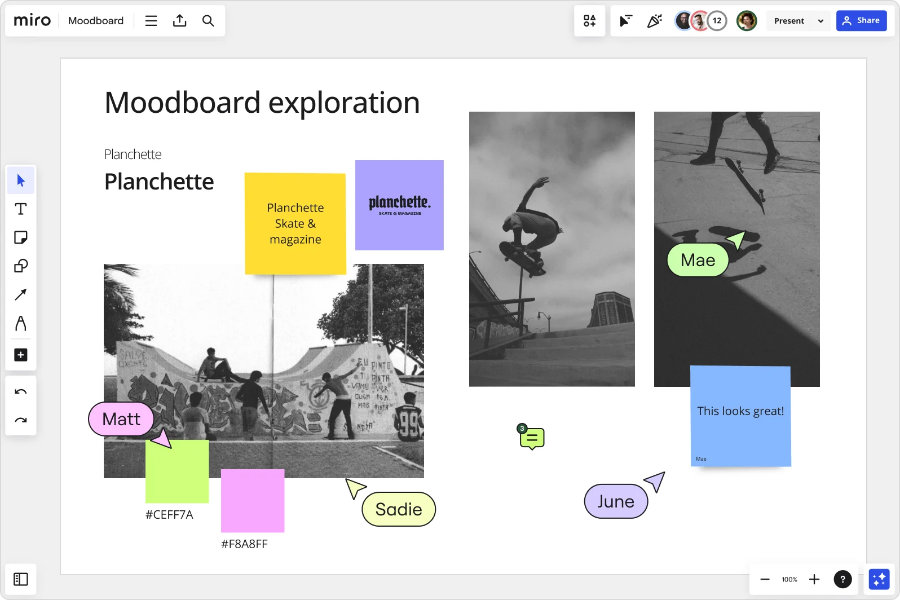
Creating Annotations and Descriptions for Clarity
One effective way to communicate the story of your moodboard is by adding annotations and descriptions to the elements.
By providing context and explaining why specific images, colors, and fonts were chosen, you can ensure clarity and alignment with the overall design vision.
These annotations can offer valuable insights into the creative decisions made throughout the moodboarding process.
You can use annotations and descriptions to highlight key details, share inspiration sources, and emphasize the significance of each component in relation to the website’s look and feel.
Understanding the Significance of Annotations
Annotations and descriptions play a crucial role in guiding viewers through your moodboard and helping them grasp the underlying narrative.
They act as a bridge between your creative vision and the audience, ensuring that your design intentions are effectively communicated and appreciated.
Step 9: Collaborating and Refining Your Vision
Allowing for collaboration and feedback is crucial in the creative process of building a website moodboard.
To refine your vision and gather diverse perspectives, it’s imperative to invite feedback and contributions from team members, clients, or other stakeholders.
Strategies for inviting feedback and contributions include setting clear objectives for the moodboard, encouraging open communication, and being receptive to different ideas and suggestions.
Strategies for Inviting Feedback and Contributions
Even though the moodboard is primarily a visual tool, the input from others can greatly enhance its effectiveness.
Explaining the rationale behind your choices and actively seeking input, you can create a more comprehensive and compelling moodboard that aligns with the project’s goals.
Engaging in constructive discussions and creating a collaborative environment fosters creativity and ensures that the final design resonates with the intended audience.
How-to Guide for Using Collaboration Tools
While traditional moodboard creation may have been a solitary task, leveraging collaboration tools can revolutionize the process.
Platforms like Milanote offer real-time editing capabilities, allowing team members to contribute simultaneously and provide instant feedback.
This seamless integration promotes teamwork, streamlines the design workflow, and facilitates efficient communication throughout the project.
This modern approach to building a website moodboard not only enhances collaboration but also expedites the design process.
Utilizing tools that enable remote teamwork and instant feedback, designers can iterate quickly, refine their ideas, and create visually stunning moodboards that capture the essence of the project.
Step 10: Soliciting and Implementing Feedback
Methods for Seeking Constructive Critiques
After completing your website moodboard, it’s important to seek feedback from others to refine your vision.
Consider sharing your moodboard with colleagues, clients, or industry peers to gather diverse perspectives on the design direction.
Online platforms like Milanote allow for easy collaboration, where team members can leave comments directly on the board, offering valuable insights and suggestions.
Tips for Handling and Acting on Feedback
On receiving feedback, it’s crucial to approach it with an open mind and willingness to iterate. Analyze the comments received, considering the feedback that aligns with the project goals and target audience.
Implementing constructive criticism can lead to a stronger, more effective moodboard that resonates with the intended users.
- After incorporating feedback, take the time to review the updated moodboard to ensure all changes enhance the overall design.
Implementing feedback is a continuous process in the creative journey.
By leveraging the suggestions provided, you can refine your website moodboard to better reflect the desired aesthetic and messaging.
- After making adjustments based on feedback, consider seeking a final round of opinions to validate the improvements made.
Summing up
Creating a stunning website moodboard in 2024 has never been easier with these 10 simple steps using Milanote.
From setting the direction of your project to adding color, fonts, and files, this modern approach to moodboarding allows for collaboration, creativity, and organization like never before.
Recall, keep an open mind, embrace feedback, and let your creativity flow as you craft a visual representation of your website’s design and style.
Start your moodboard journey today and watch your ideas come to life!
FAQ
Q: What is a website moodboard?
A: A website moodboard is a collection of visual materials that evoke a certain style or concept for a website design before the actual design phase begins. It includes inspiration and visual references for elements like imagery, fonts, layout, buttons, and navigation.
Q: How can creating a moodboard in Milanote enhance the design process?
A: Milanote allows for a modern approach to creating a website moodboard by offering features like video embedding, collaboration tools, and the ability to evolve the moodboard over time. This enhances creativity and communication within design teams.
Q: What are the key steps to creating a website moodboard in 10 simple steps?
A: The key steps include setting the project direction, collecting existing materials, adding inspiring imagery, including examples of motion and sound, incorporating color, fonts, and files, organizing the moodboard, remaining open to inspiration, explaining the thought process, collaborating with team members, and seeking feedback for improvements.